Growing vegetables in containers is a great way to get fresh, healthy produce without taking up too much space. Whether you have a small balcony or a large garden, you can easily find the right container and start growing your own vegetables. Here are 5 of the best vegetables to grow in containers that will produce delicious results for you and your family.
Beans
Choose the Right Container: Beans need a container that is at least 12 inches deep and wide. You can use a plastic or terracotta pot. Make sure it has drainage holes at the bottom to prevent waterlogging. The container should be large enough to hold one or two bean plants.
Choose the Right Soil: Beans prefer well-draining soil that is rich in organic matter. You can use a potting mix or make your own by mixing equal parts of compost and perlite or vermiculite. Avoid using garden soil, as it can be too heavy and compacted for container gardening.
Choose the Right Bean Variety: There are many varieties of beans to choose from, including bush and pole beans. Bush beans are ideal for containers because they are compact and do not require support. Pole beans, on the other hand, will need a trellis or support to climb. Choose a variety that is suitable for your container size.
Planting: Fill the container with the prepared soil leaving about 2-3 inches at the top. Create a small hole in the soil with your finger or a trowel and plant the bean seed about 1 inch deep. Space the seeds at least 2-3 inches apart. If you are planting pole beans, insert the trellis or support into the container before planting the seeds.
Watering: Water the beans regularly, especially during hot and dry weather. Keep the soil moist but not waterlogged, as beans do not tolerate standing water. Watering once or twice a week should be enough, depending on the climate and soil type.
Fertilizing: Beans are nitrogen-fixing plants, meaning they can obtain their nitrogen from the air. However, you can still fertilize your beans to provide them with additional nutrients. Use a balanced fertilizer that contains equal amounts of nitrogen, phosphorus, and potassium. Apply the fertilizer according to the manufacturer's instructions.
Harvesting: Beans are ready to be harvested when they are about 3-4 inches long and are still tender. Pick the beans regularly to encourage more production. Beans can be harvested for several weeks or even months, depending on the variety.

Lettuce
Choose the Right Container: Lettuce needs a container that is at least 6-8 inches deep and wide. You can use a plastic or terracotta pot, or even a window box. Make sure the container has drainage holes at the bottom to prevent waterlogging. The container should be large enough to hold several lettuce plants.
Choose the Right Soil: Lettuce prefers well-draining soil that is rich in organic matter. You can use a potting mix or make your own by mixing equal parts of compost and perlite or vermiculite. Avoid using garden soil, as it can be too heavy and compacted for container gardening.
Choose the Right Lettuce Variety: There are many varieties of lettuce to choose from, including loose-leaf, butterhead, and romaine lettuce. Loose-leaf lettuce is ideal for containers because it grows quickly and does not form a head. Romaine lettuce and butterhead lettuce are also good choices but may require a slightly larger container.
Planting: Fill the container with the prepared soil, leaving about 2-3 inches at the top. Scatter the lettuce seeds over the soil and cover with a thin layer of soil. Press the soil down gently to ensure good seed-to-soil contact. Space the seeds at least 2-3 inches apart. You can also plant seedlings instead of seeds for quicker results.
Watering: Water the lettuce regularly, keeping the soil moist but not waterlogged. Lettuce prefers consistent moisture and will wilt if it dries out. Watering once or twice a week should be enough, depending on the climate and soil type.
Fertilizing: Lettuce is a heavy feeder and will benefit from regular fertilizing. Use a balanced fertilizer that contains equal amounts of nitrogen, phosphorus, and potassium. Apply the fertilizer according to the manufacturer's instructions.
Harvesting: Lettuce is ready to be harvested when the leaves are large enough to eat, usually within 4-6 weeks of planting. Pick the outer leaves first and leave the center intact to encourage more growth. Lettuce can be harvested for several weeks or even months, depending on the variety.

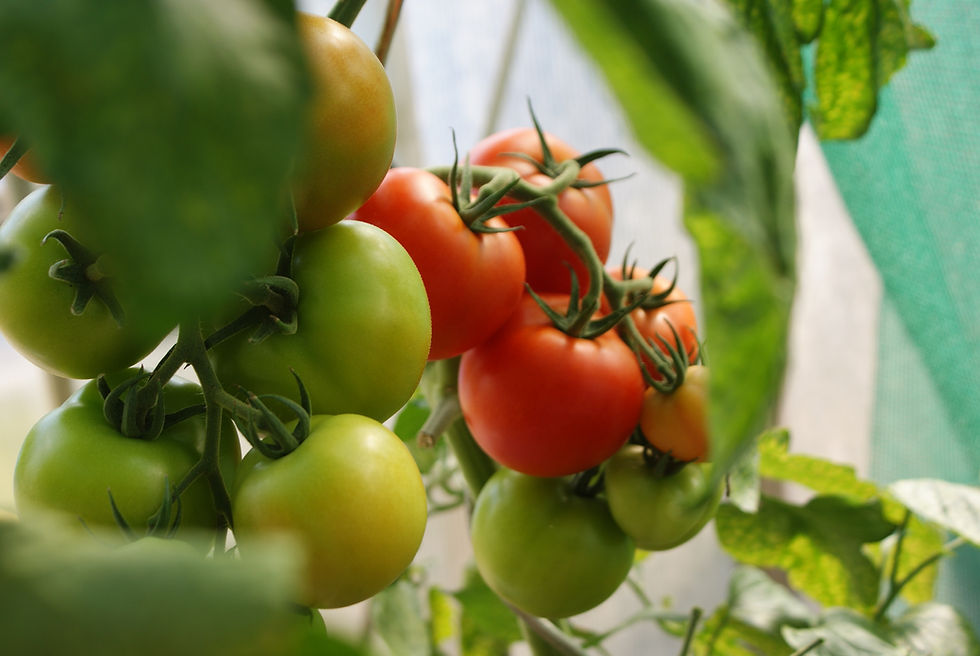
Tomatoes
Choose the Right Container: Tomatoes need a container that is at least 12-18 inches deep and wide. You can use a plastic or terracotta pot. Make sure it has drainage holes at the bottom to prevent waterlogging. The container should be large enough to hold one or two tomato plants.
Choose the Right Soil: Tomatoes prefer well-draining soil that is rich in organic matter. You can use a potting mix or make your own by mixing equal parts of compost and perlite or vermiculite. Avoid using garden soil, as it can be too heavy and compacted for container gardening.
Choose the Right Tomato Variety: There are many varieties of tomatoes to choose from, including determinate and indeterminate varieties. Determinate tomatoes are ideal for containers because they are compact and do not require staking. Indeterminate tomatoes, on the other hand, will need a trellis or support to grow vertically. Choose a variety that is suitable for your container size.
Planting: Fill the container with the prepared soil, leaving about 2-3 inches at the top. Create a small hole in the soil with your finger or a trowel and plant the tomato seedling deep enough to cover the stem up to the first set of leaves. This will encourage the plant to develop a strong root system. Space the plants at least 2-3 inches apart. If you are planting indeterminate tomatoes, insert the trellis or support into the container before planting the seedling.
Watering: Water the tomatoes regularly, keeping the soil consistently moist but not waterlogged. Tomatoes need regular watering, especially during hot and dry weather. Watering once or twice a week should be enough, depending on the climate and soil type.
Fertilizing: Tomatoes are heavy feeders and will benefit from regular fertilizing. Use a balanced fertilizer that contains equal amounts of nitrogen, phosphorus, and potassium. Apply the fertilizer according to the manufacturer's instructions.
Pruning: Tomatoes may need to be pruned to keep them from becoming too bushy and to encourage fruit production. Remove any suckers that develop in the leaf axils, as these will divert energy from fruit production.
Harvesting: Tomatoes are ready to be harvested when they are firm, fully colored, and slightly soft to the touch. Pick the tomatoes regularly to encourage more production. Tomatoes can be harvested for several weeks or even months, depending on the variety.
Spinach
Choose the Right Container: Spinach can be grown in a container that is at least 6-8 inches deep and wide. You can use a plastic or terracotta pot. Make sure it has drainage holes at the bottom to prevent waterlogging. The container should be large enough to hold several spinach plants.
Choose the Right Soil: Spinach prefers well-draining soil that is rich in organic matter. You can use a potting mix or make your own by mixing equal parts of compost and perlite or vermiculite. Avoid using garden soil, as it can be too heavy and compacted for container gardening.
Choose the Right Spinach Variety: There are many varieties of spinach to choose from, including smooth-leaf, savoy-leaf, and semi-savoy-leaf varieties. Choose a variety that is suitable for your container size.
Planting: Fill the container with the prepared soil, leaving about 1-2 inches at the top. Create a small hole in the soil with your finger or a trowel and plant the spinach seeds about 1 inch deep and 2-3 inches apart. If you prefer to plant seedlings, plant them deep enough to cover the root ball. Space the plants at least 2-3 inches apart.
Watering: Water the spinach regularly, keeping the soil consistently moist but not waterlogged. Spinach needs regular watering, especially during hot and dry weather. Watering once or twice a week should be enough, depending on the climate and soil type.
Fertilizing: Spinach does not require heavy fertilizing, but it will benefit from a light application of fertilizer every few weeks. Use a balanced fertilizer that contains equal amounts of nitrogen, phosphorus, and potassium. Apply the fertilizer according to the manufacturer's instructions.
Care: Spinach is a cool-season crop and prefers temperatures between 50-70°F. It can be grown in full sun or partial shade, depending on the climate. Keep the soil consistently moist and weed around the spinach plants regularly to prevent competition for nutrients.
Harvesting: Spinach is ready to be harvested when the leaves are large enough to eat, usually after about 6-8 weeks. Pick the outer leaves first, leaving the center leaves to continue growing. Spinach can be harvested for several weeks, depending on the variety.

Peppers
Choose the Right Container: Peppers need a container that is at least 12-18 inches deep and wide, with drainage holes at the bottom. You can use a plastic or terracotta pot, but make sure it is large enough to accommodate the size of the pepper plant you choose.
Choose the Right Soil: Peppers prefer well-draining soil that is rich in organic matter. You can use a potting mix or make your own by mixing equal parts of compost and perlite or vermiculite. Avoid using garden soil, as it can be too heavy and compacted for container gardening.
Choose the Right Pepper Variety: There are many varieties of peppers to choose from, including sweet peppers, hot peppers, and bell peppers. Choose a variety that is suitable for your container size and climate.
Planting: Fill the container with the prepared soil, leaving about 1-2 inches at the top. Create a small hole in the soil with your finger or a trowel and plant the pepper seedling or transplant. Make sure the root ball is covered with soil and the plant is planted at the same depth as it was in its original container.
Watering: Water the pepper regularly, keeping the soil consistently moist but not waterlogged. Peppers need regular watering, especially during hot and dry weather. Watering once or twice a week should be enough, depending on the climate and soil type.
Fertilizing: Peppers benefit from regular fertilizing, especially when they start to bloom and produce fruit. Use a balanced fertilizer that contains equal amounts of nitrogen, phosphorus, and potassium. Apply the fertilizer according to the manufacturer's instructions.
Care: Peppers need at least 6-8 hours of direct sunlight every day. They can be grown in full sun or partial shade, depending on the climate. Make sure the container is placed in a sunny location, protected from strong winds. Keep the soil consistently moist and weed around the pepper plant regularly to prevent competition for nutrients.
Harvesting: Peppers are ready to be harvested when they reach their mature size and color, usually after about 60-90 days. Pick the peppers with a sharp knife or scissors, leaving a small piece of stem attached to the fruit. The peppers will continue to ripen off the plant, so you can pick them when they are still green and allow them to ripen on the kitchen counter.

Container gardening is a fantastic way to grow your own vegetables even if you don't have a lot of outdoor space. By selecting the right vegetables and providing them with proper care, you can enjoy fresh and healthy produce straight from your container garden. From the sweet and crispy lettuce to the juicy and flavorful tomatoes, the spicy and colorful peppers to the nutrient-packed spinach, and the versatile and protein-rich beans, these five vegetables are sure to make a great addition to your container garden. Get started today. Start enjoying the delicious and rewarding experience of growing your own vegetables in containers. Now go grow something!
Before you go...
Don't miss out on the opportunity to track your plant's growth and health for free! Download our plant tracker today and take the first step towards becoming a more successful and informed gardener. With our tracker, you'll be able to monitor your plant's progress, and track watering and fertilizing schedules. Download now and start growing your best plants yet!

Comments